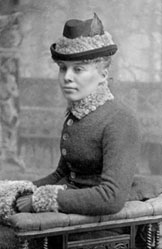
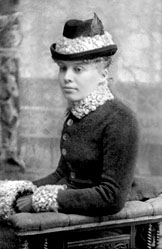
The dodge and burn tools work great on black & white scans, especially when it comes to improving image contrast and restoring image detail.
Before Dodging/Burning:
After Dodging/Burning:
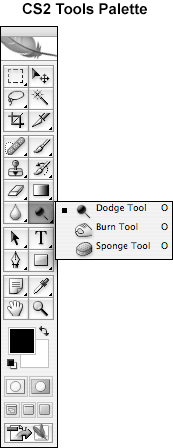
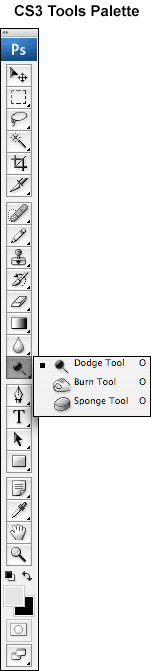
The Dodge, Burn and Sponge tools all share one icon on the toolbox, and are often referred to as Toning Tools because they are used to alter or correct image tone:
The Dodge tool is used to lighten selected tones, whereas the Burn tool darkens selected tones in an image. By selected tones, I mean you can lighten and darken the Highlights, the Midtones or the Shadows in an image separately. This gives you greater flexibility because when you lighten the Highlights with the Dodge tool, for example, the Midtones and Shadows remain relatively unaffected, even when you brush right over them.
When the Dodge tool is selected in the tools palette, the following settings are available in the Dodge Options Bar:

Use the Dodge Options Bar to set an Exposure value; this value controls the intensity of the applied effect. Lower values minimize the effects of the Dodge tool; higher values emphasize the effects of the Dodge tool. Keep in mind that you must increase or decrease the Exposure value before you “paint” on your image with the Dodge tool. If you find that the effects of painting are too severe, select Undo from the Edit Menu (or use the quick keyboard shortcut, Command Z for Mac or Control Z for Windows), lower the Exposure value, and try again.
In the Range pop-up menu in the Dodge Options Bar, you can select whether you want to lighten your image’s Highlights, Midtones, or Shadows:
- Highlights—the lightest, whitest tones in your image
- Midtones—the neutral gray, mid-range tones
- Shadows—the darkest, blackest tones
When the Dodge tool is selected in the tools palette and Highlights is selected in the Dodge options bar, as you brush over the lightest parts of your image, the whites will become whiter, but the shadows (the blacks) are relatively unaffected. (This technique works great on scans of old handwritten documents where you want to lighten and get rid of the pale gray blotches in the background without degrading or lightening the quality of the handwriting itself.)
To darken, rather than lighten, portions of an image, select the Burn Tool in the tools palette and the same options are available to you in the Burn Options Bar:

The Burn tool works exactly like the Dodge tool except that the Burn tool darkens selected tones.
Since you are essentially “painting” on your image when you use the Dodge and Burn tools, make sure to pick a brush that suits the job. Brushes with soft edges work best. Also, don’t Dodge or Burn large areas at once. Instead, use a smaller brush and target specific problem areas. The Dodge tool, for example, works great on brightening up the whites of people’s eyes. Use the Burn tool on midtones or shadows to bring out background detail that was lost in the scanning process or with age.