The easiest way to adjust image tone and contrast is with the Levels dialog box. This tutorial also works with color photos but is best explained using a black and white (grayscale) image.
From the Image Menu, select Adjustments and then select Levels from the pop-up menu. It is much easier, though, to just use the keyboard shortcut: Command L for Mac or Control L for Windows:
The Levels dialog box will appear:
You can alter the contrast of the image by adjusting the Input Levels Slider directly below the histogram. This slider is made up of three tiny triangles that you can move to the left or right. Moving to the left lightens; moving to the right darkens.
Each triangle lightens or darkens a particular tonal range:
- Shadows (black triangle): Darkens or lightens only the darkest tones (pixels) in the image.
- Midtones (gray triangle): Darkens or lightens all but the lightest and darkest tones (pixels) in the image—the medium, neutral grays. This value is almost always referred to as the Gamma.
- Highlights (white triangle): Darkens or lightens only the lightest tones (pixels) in the image.
If the Preview box is checked you can view changes on your image as you make them. You can also hit the Auto button and Photoshop will make the tonal adjustments it thinks are needed (and Photoshop is not always right so get into the habit of making these adjustments yourself).
You can get a good idea of what tonal adjustments to make by looking at the histogram, which shows how the Shadow, Midtone and Highlight pixels are distributed in the image. An image with good tonal range has a balanced, even distribution of pixels in the histogram without gaping holes where there appear to be no pixels at all.
The histogram for the image in this tip, for example, has a big gaping hole to the right of the peak in the Highlights area. That means there are no pixels that are completely white. To correct this, move the Highlights triangle on the slider to the left until it is just at the base of the peak like in the illustration below:
I also lightened the Midtones as well by moving the Midtones triangle to the left. Whenever you want to lighten a photo, sliding the Midtones triangle to the left is a good start.
Once you are finished, click OK. Open the Levels dialog box again (Command L for Mac or Control L for Windows) and you'll see that the pixels in the histogram are now more evenly distributed:
Another method is called Setting the Black and White Points. On the bottom right side of the Levels dialog box, notice that there are 3 eyedroppers. The first eyedropper is filled with black ink (shadows) and is used for setting the black point; the last eyedropper is filled with white ink (highlights) and is used for setting the white point. The middle eyedropper will be grayed out if your are working in Grayscale mode.
To set the black and white points, click on the eyedropper filled with black ink in the Levels dialog box to select it and then click once on the very darkest, blackest part of your image in the image window. Then click on the eyedropper filled with white ink and click on the lightest, whitest part of your image. You can make further tonal adjustments to the image if you want using the triangle slider for the midtones. Once you are done, click OK.
At anytime when you are working in the Levels dialog box, you can reset the tonal adjustments back to their original settings by holding down the Option key (Mac) or Alt key (Windows). The Cancel button becomes a Reset button. Your settings will be back to the way they were when you first brought up the Levels dialog box.
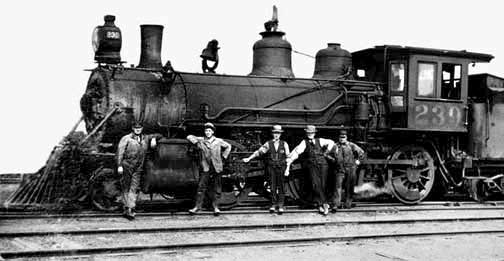
Before Levels:
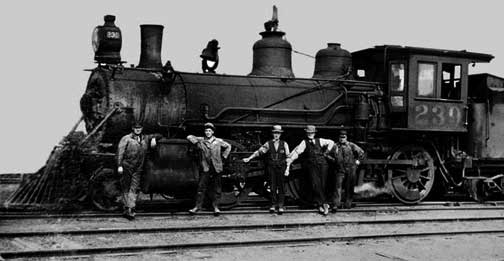
After Levels: